If you’ve ever faced the challenge of customizing your pegboard, you know that cutting it just right can feel tricky. Whether you want to fit it perfectly around outlets, doors, or windows, or simply need to size it for your workspace, knowing the best way to cut pegboard saves you time and frustration.
In this guide, you’ll discover simple, effective techniques that anyone can use—no special skills required. From using a utility knife for quick trims to handling power tools for cleaner, precise cuts, you’ll learn how to get the job done smoothly and safely.
Keep reading, and you’ll soon be ready to transform your pegboard into the perfect organizing solution for your space.
Tools For Cutting Pegboard
Cutting pegboard requires the right tools for clean and precise results. Choosing proper tools makes the job easier and safer. Different tools suit different types of cuts and pegboard thicknesses. Some cuts need only simple hand tools, while others require power saws for accuracy.
Utility Knife And Straightedge
This method works well for thinner pegboards and straight lines. First, measure and mark the cut line using a pencil and tape measure. Next, place a straightedge like a ruler or square along the line. Score the pegboard by running the utility knife along the straightedge several times. The board will snap cleanly along the scored line. This tool is affordable and easy to use.
Jigsaw
A jigsaw handles thicker pegboard or curved cuts well. Measure and mark the cut line clearly. Clamp a straightedge to guide the jigsaw for straight cuts. Use a fine-toothed blade to prevent chipping. Cut slowly to maintain control and follow the marked line closely. The jigsaw offers flexibility for detailed shapes.
Circular Saw
Use a circular saw for fast, straight cuts on thicker pegboard. Measure and mark the cut line. Place the pegboard with the decorative side down to reduce scratches. Use a blade designed for wood or laminate for smooth cutting. Cut between the pegboard holes to avoid damaging the material. Wear safety gear to protect eyes and lungs from dust.
Table Saw
A table saw delivers the cleanest and most precise cuts. Place the pegboard with the finished side facing up to protect the surface. Set the saw blade to the correct height before cutting. Feed the pegboard slowly and steadily for the best finish. This tool suits large projects and multiple cuts with uniform size.
Measuring And Marking
Measuring and marking pegboard correctly is the first step to a clean, precise cut. Accurate measurements prevent mistakes and wasted material. Take your time to measure twice and mark once for the best results.
Use a reliable tape measure to get exact dimensions. Mark the cut line clearly with a pencil. A sharp, fine pencil line helps guide your cut smoothly.
Marking straight lines is easier with a straightedge or ruler. Align the ruler along your measurement marks. Draw the line slowly and steadily for a clean guide. This step ensures your cut will be straight and accurate.
Choosing The Right Measuring Tools
Use a quality tape measure for precise length. A carpenter’s square helps mark straight, square lines. A pencil with a fine tip creates clear marks without smudging. Avoid thick or blunt markers that can blur your lines.
Marking Your Cut Line Clearly
Draw your cut line on the pegboard surface lightly. Check that the line is visible but not too thick. A thin line guides your saw or knife without causing confusion. Double-check measurements before making any cuts.
Tips For Accurate Measuring And Marking
Measure twice to avoid errors. Use the edge of the pegboard as a reference point. Mark at multiple spots along the cut line. Connect the marks with a straight ruler for a clean line. Keep your workspace well-lit to see markings clearly.
Scoring Thin Pegboard
Scoring thin pegboard is a simple and effective way to make straight cuts without power tools. This method works best for pegboards that are lightweight and easy to snap after scoring. It requires minimal tools and is perfect for quick projects or small adjustments.
By scoring the pegboard along a marked line, you create a weak point that allows the board to break cleanly. This technique saves time and reduces mess compared to sawing. It also keeps the edges smoother, which is useful for visible sections of your project.
Prepare Your Workspace
Clear a flat surface to work on. Lay the pegboard down with the finished side facing up. Gather a straightedge, utility knife, and measuring tape. Make sure you have enough light to see your lines clearly.
Measure And Mark The Cut Line
Use a measuring tape to find the exact spot to cut. Mark your line lightly with a pencil. Double-check the measurements to avoid mistakes. A clear, straight line helps guide the scoring process.
Score The Pegboard
Place a straightedge along your pencil line. Hold it firmly to prevent slipping. Run the utility knife along the edge, pressing hard enough to score the surface. Repeat the scoring several times for a deep groove.
Snap The Pegboard Along The Score
Lift the pegboard slightly on one side of the score line. Apply steady pressure to snap it cleanly along the groove. Use both hands for control. If the board does not snap easily, score deeper and try again.
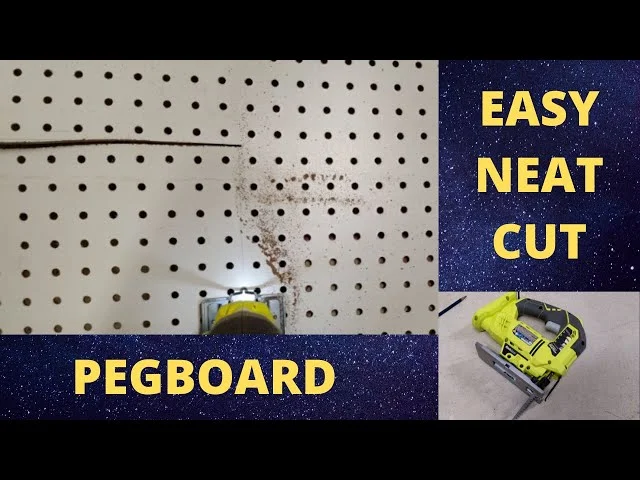
Credit: www.youtube.com
Cutting With Power Saws
Cutting pegboard with power saws offers speed and precision. It handles complex shapes and long straight cuts with ease. Choose the right saw for your pegboard thickness and desired cut quality. Always prioritize safety by wearing eye protection and a dust mask. Power saws make large projects faster and cleaner.
Using A Circular Saw For Pegboard
Measure and mark your cut line clearly. Place the pegboard with the finished side down. This prevents surface scratches. Use a fine-tooth blade for smoother cuts. Cut slowly to avoid splintering the edges. Keep the saw steady along the marked line. Cutting between peg holes helps maintain board strength.
Cutting Pegboard With A Jigsaw
Mark your cutting line on the pegboard surface. Secure the pegboard to your workbench to prevent movement. Use a fine-tooth blade designed for wood or hardboard. Follow the marked line carefully for straight or curved cuts. A clamped straightedge guide helps maintain precision. Jigsaws work well for detailed or irregular shapes.
Table Saw Technique For Pegboard
Set the pegboard with the finished side up on the table saw. Use a fine-tooth blade to reduce splintering. Adjust the fence to guide the pegboard smoothly through the blade. Push the pegboard evenly and steadily to avoid binding. Cutting between holes reduces damage to the pegboard structure. Always use a push stick for safety near the blade.
Cutting Around Outlets And Openings
Cutting pegboard around outlets and openings requires care and precision. These areas are tricky because you must avoid damaging electrical components or leaving uneven edges. Proper measurements and the right tools help make clean cuts that fit perfectly around outlets and other openings.
Start by measuring the size and position of the outlet or opening on the pegboard. Mark the cut lines clearly with a pencil. Use a straightedge to guide your markings and ensure they are straight and accurate.
Marking The Outlet Or Opening On The Pegboard
Place the pegboard flat on a work surface with the front side up. Use a ruler or tape measure to find the exact spot of the outlet or opening. Mark the outline lightly with a pencil. Double-check the measurements before cutting.
Choosing The Right Tool For Cutting
Use a jigsaw with a fine blade for cutting around outlets and openings. A rotary tool with a cutting bit also works well for detailed cuts. Avoid using a circular saw here because it is harder to control around tight spaces.
Cutting The Pegboard Around The Outlet
Drill a starter hole inside the marked area to fit the jigsaw blade. Carefully cut along the marked lines, moving slowly for better control. Keep the pegboard steady to avoid splintering or uneven edges.
Smoothing And Finishing The Cut Edges
After cutting, use sandpaper or a file to smooth rough edges. This step prevents splinters and ensures the pegboard fits snugly around the outlet or opening. Clean the surface before mounting the pegboard.
Using Painter’s Tape For Smooth Edges
Using painter’s tape is a simple way to get smooth edges on your pegboard cuts. It helps reduce splintering and chipping along the cut line. This method is especially useful when cutting with power tools like jigsaws or circular saws.
The tape holds the wood fibers in place as you cut, which keeps the edges clean and neat. It also makes it easier to mark your cut line clearly. Painter’s tape is easy to apply and remove without damaging the pegboard surface.
Preparing The Pegboard With Painter’s Tape
First, clean the pegboard surface to remove dust. Tear a strip of painter’s tape slightly wider than your cut line. Stick the tape firmly along the area where you plan to cut. Press down the tape edges to prevent lifting during cutting. Use a pencil to mark your cut line directly on the tape.
Cutting Along The Tape Line
Use a sharp blade or saw for the best results. Follow the pencil line on the tape carefully while cutting. The tape will help keep the wood fibers intact along the edges. Take your time to avoid tearing the tape or board. After cutting, gently peel off the tape from the pegboard surface.
Finishing Touches For Smooth Edges
Lightly sand the cut edges with fine-grit sandpaper. This removes any small splinters or rough spots left from cutting. Wipe the edges clean with a dry cloth. Painter’s tape prevents rough edges, but sanding ensures a fully smooth finish. Your pegboard will now have clean, professional-looking cuts ready for installation.
Avoiding Damage To Pegboard Holes
Cutting pegboard requires care to keep the holes intact. Damaged holes can reduce the pegboard’s usefulness. Avoiding damage protects the pegboard’s strength and appearance. Follow simple steps to keep the holes neat and clean during cutting.
Choose The Right Cutting Tool
Select a tool that cuts smoothly without tearing the holes. A fine-toothed saw or a sharp utility knife works well. Avoid rough or dull blades that can splinter the pegboard edges. Clean cuts prevent hole damage and make the board last longer.
Cut Between Pegboard Holes
Plan your cut lines carefully. Position your cut between the rows of holes. This prevents cutting through the holes and causing breakage. Mark the lines clearly with a pencil before cutting. Cutting in open spaces keeps the holes intact and strong.
Secure The Pegboard Firmly
Clamp the pegboard to a stable surface before cutting. A firm hold stops the board from moving or vibrating. Movement can cause cracks or chipped holes. Use soft clamps or padding to avoid pressing too hard on the holes.
Cut Slowly And Steadily
Take your time while cutting the pegboard. Fast, rough cutting increases the chance of damage. Use steady, controlled movements with your saw or knife. This approach keeps the holes clean and prevents splintering around the edges.

Credit: craftyourhappiness.com
Sealing And Finishing Edges
Sealing and finishing edges is an important step after cutting pegboard. It protects the board from moisture and damage. This process also gives the pegboard a neat, polished look. Taking time to seal edges helps the pegboard last longer and stay strong.
Finishing edges prevents the cut sides from chipping or peeling. It stops water from soaking into the board, which can cause warping or swelling. Proper sealing maintains the pegboard’s durability and appearance over time.
Choosing The Right Sealant
Select a sealant made for wood or hardboard materials. Clear polyurethane or acrylic sealers work well. These sealants dry fast and provide a strong protective layer. Avoid thick sealants that can clog peg holes.
Applying Sealant To Edges
Use a small paintbrush to apply sealant evenly on cut edges. Apply a thin coat and let it dry completely. Lightly sand the edges with fine-grit sandpaper after drying. Then apply a second coat for extra protection.
Sanding Edges Smooth
Before sealing, sand edges to remove rough spots and splinters. Use medium-grit sandpaper first, then finish with fine-grit. Smooth edges reduce wear and improve the pegboard’s look. Clean dust off the edges before sealing.
Optional Edge Trim For A Clean Finish
Adding a trim or molding around the edges hides rough cuts. Use wood strips cut to the pegboard size. Attach trim with wood glue or small nails. This step gives a clean, professional finish and extra edge protection.
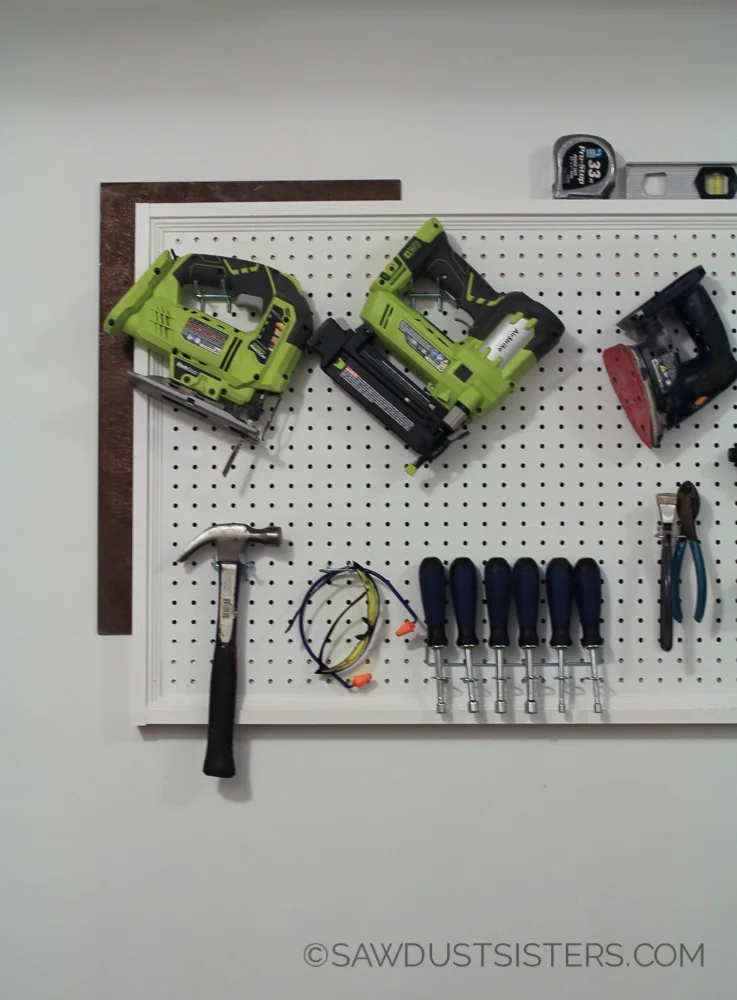
Credit: sawdustsisters.com
Frequently Asked Questions
What Do You Use To Cut Pegboard?
Use a utility knife and straightedge for simple cuts on thin pegboard. For cleaner cuts, use a jigsaw, circular saw, or table saw with a fine-tooth blade. Always cut between holes and wear safety gear like eye protection and a dust mask.
Can You Cut Pegboard With A Circular Saw?
Yes, you can cut pegboard with a circular saw. Place the finished side down to avoid scratches. Use a high-tooth blade and cut between holes for a clean edge. Always wear eye protection and a dust mask for safety.
What Is The Best Tool To Cut Hardboard With?
The best tool to cut hardboard is a circular saw with a high-tooth-count blade for clean, precise cuts. A jigsaw works well for curves or detailed cuts. Always secure the board and wear safety gear to ensure accuracy and safety.
How To Cut Pegboard Around Outlet?
Measure and mark the outlet area on the pegboard. Use a jigsaw or utility knife to cut carefully around the marked outlet shape. Cut between peg holes to avoid damage. Install the pegboard on the wall first for precise outlet fitting.
Wear safety gear during cutting.
What Tools Are Best For Cutting Pegboard?
Utility knives work for thin pegboard; jigsaws and circular saws suit thicker, cleaner cuts.
Conclusion
Cutting pegboard is simple with the right tools and steps. Measure carefully and mark your cut line clearly. Use a utility knife for thin boards or a saw for thicker ones. Place the pegboard correctly to avoid scratches. Always wear eye protection and a mask for safety.
Take your time and cut between holes when possible. These tips help you achieve clean, accurate cuts every time. Now, you are ready to customize your pegboard for any project.
