Are you about to work on an electrical project but unsure if the power is off? Using a voltage tester is the safest way to check if wires or outlets carry electricity.
But how do you use one correctly? If you’ve never handled a voltage tester before, it might feel confusing or even risky. Don’t worry—this guide will walk you through simple steps to confidently test voltage in your home or workspace.
By the end, you’ll know exactly how to use your voltage tester to protect yourself and get the job done right. Keep reading to learn easy, clear techniques that anyone can follow.
:max_bytes(150000):strip_icc()/how-to-use-a-multimeter-5194980-01-acb6dc0e02254358b597206a4b1ba48e.jpg)
Credit: www.thespruce.com
Types Of Voltage Testers
Voltage testers come in various types, each designed for specific tasks. Choosing the right tester helps ensure safety and accuracy. Understanding the main types makes it easier to handle electrical work confidently.
Non-contact Voltage Testers
Non-contact voltage testers detect electricity without touching wires. They sense electrical fields around live wires. This type is safe and easy to use for quick checks. Just hold the tester near the wire or outlet. It will light up or beep if voltage is present. Ideal for checking if a wire is live before working.
Contact Voltage Testers
Contact voltage testers require direct contact with the wire or terminal. They have metal probes to touch the electrical source. These testers often show voltage through lights or sounds. They give a more precise reading than non-contact testers. Best for checking voltage levels and continuity in circuits.
Multimeters And Voltage Testers
Multimeters measure voltage, current, and resistance in one tool. They offer detailed readings on digital displays. You can use probes to test different parts of a circuit. Multimeters are versatile for many electrical tasks. They work well for troubleshooting and detailed diagnostics.
Safety Gear And Precautions
Using a voltage tester requires strict attention to safety. Wearing the right gear protects you from electric shocks and injuries. Following clear precautions lowers risks during testing.
Always prepare before starting. Understand the tool and the environment. Safety gear is a key part of this preparation.
Insulated Tools
Choose tools with insulated handles. Insulation blocks electricity from reaching your hand. This reduces shock chances if you touch live wires. Never use tools with damaged insulation. Check for cracks or wear before use.
Personal Protective Equipment
Wear safety glasses to protect your eyes from sparks. Use rubber gloves to avoid electric shocks. Wear shoes with rubber soles for extra insulation. Avoid loose clothing or metal jewelry. These can catch on wires or conduct electricity.
Power Off Vs. Live Testing
Turn off power before testing if possible. This lowers the risk of shock. Some tests need live wires to check voltage. In those cases, use extra caution. Stand on insulated mats and keep one hand behind your back. Never rush; work calmly and carefully.
Preparing The Voltage Tester
Preparing the voltage tester is a crucial step before starting any electrical work. A well-prepared tester ensures accurate results and keeps you safe. This section explains how to get your voltage tester ready for use.
Checking Battery And Calibration
First, check the battery of your voltage tester. A low battery can give false readings or no readings at all. Replace the battery if the tester shows a weak or no power indication. Also, verify the calibration of the device. Some testers need regular calibration to maintain accuracy. Refer to the user manual for calibration instructions or service intervals.
Powering On The Device
Turn on your voltage tester by pressing the power button. Hold it steady for a moment to allow the device to start up. Many testers beep or flash lights to show they are active. If your tester does not power on, check the battery or try another power source. Never use a device that fails to turn on properly.
Familiarizing With Indicators
Understand the meaning of all the lights, sounds, or symbols on your tester. Most voltage testers have LED lights that show voltage presence. Some have audible alerts or display numbers for voltage levels. Knowing these signs helps you read the results quickly and correctly. Practice by testing known live and dead circuits to see how your tester reacts.
Testing Electrical Outlets And Wires
Testing electrical outlets and wires is a vital step in checking electrical safety and functionality. A voltage tester helps identify if electricity flows through the outlet or wire. This process prevents accidents and ensures repairs are done correctly.
Knowing how to test outlets and wires gives confidence when working with home electricity. It reveals live wires and confirms power presence without guesswork. This section explains how to locate test points, use probes safely, and read the tester results.
Locating Test Points
Start by turning off the power at the circuit breaker for safety. Remove the outlet cover carefully using a screwdriver. Look for the metal terminals or wires inside the outlet box. These are the spots where the voltage tester probes will touch.
For wires, find exposed ends or terminals that connect to devices or switches. These points show if voltage is present. Always test more than one spot to confirm power flow in the circuit.
Using Probes Safely
Hold the voltage tester by its insulated handle only. Avoid touching metal parts to prevent electric shocks. Place one probe on the neutral terminal or wire. Then, touch the other probe to the hot terminal or wire.
Do not force the probes into tight spaces. Keep steady hands to avoid slipping. Wear rubber gloves for extra protection when working with high voltage. Always test the voltage tester on a known live source before and after use.
Interpreting Results
A voltage tester shows if electricity flows by lighting up or beeping. If the tester glows or sounds, voltage is present at the test point. No light or sound means no voltage or a broken circuit.
Compare readings from different terminals to understand wiring status. A steady light often means proper voltage, while flickering can indicate loose connections. Use the tester readings to decide if the outlet or wire needs repair or replacement.
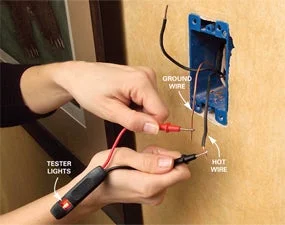
Testing Switches And Fixtures
Testing switches and fixtures is a key step in electrical safety. It helps confirm if the device is live or dead before any repair or replacement. Using a voltage tester correctly can prevent shocks and ensure the circuit is safe to work on.
Accessing Terminals
First, turn off the power at the breaker panel. Remove the switch or fixture cover carefully. Locate the terminals where wires connect. These are usually screws or clips on the side or back. Make sure you have clear access to these points.
Detecting Voltage Presence
Turn on the voltage tester and hold it by the insulated handle. Touch the tester tip to each terminal carefully. If the tester lights up or beeps, voltage is present. No signal means the terminal is not live. Repeat this for all terminals to check each wire.
Confirming Circuit Status
After testing, switch off the power again. Use the tester to check the terminals once more. Confirm no voltage shows before touching wires or parts. This step ensures the circuit is fully de-energized. Always double-check to avoid electric shocks.
Using Voltage Testers On Vehicles
Using voltage testers on vehicles helps check electrical problems quickly. These testers find voltage in car batteries and circuits. They show if parts get power or not. This saves time and money on repairs. Safety is key when testing vehicle electricity. Follow steps carefully to avoid damage or injury.
Testing Car Batteries
Start by turning off the car engine. Set the voltage tester to DC voltage mode. Connect the red probe to the battery’s positive terminal. Attach the black probe to the negative terminal. Read the voltage on the tester display. A healthy car battery shows about 12.6 volts. Lower voltage means the battery may be weak or dead. Testing helps decide if the battery needs charging or replacement.
Checking Electrical Circuits
Turn off the car before testing circuits. Set the tester to the correct voltage range. Touch probes to the circuit points you want to check. Look for voltage reading or tester light to confirm power. Check fuses, wires, and switches for faults. Use the tester to find where electricity stops. This helps fix issues like broken lights or no-start problems. Always test on clean, dry contacts for accuracy.
Avoiding Common Mistakes
Do not test while the engine runs unless needed. Avoid touching metal parts with your hands during testing. Always hold the tester by its insulated handle. Do not use a damaged tester or probes. Double-check tester settings before use. Keep probes steady to get correct readings. Never test circuits with wet hands or in wet places. Follow safety rules to protect yourself and your car.
Common Troubleshooting Tips
Using a voltage tester is simple, but some common issues can affect its accuracy. These troubleshooting tips help ensure reliable results and safe use. Understanding these tips keeps your testing effective and prevents mistakes.
False Positives And Interference
False positives happen when the tester shows voltage where none exists. Nearby electrical devices or strong electromagnetic fields can cause this. Keep the tester away from motors, transformers, or fluorescent lights during testing. Always double-check suspicious readings with another tool or test point.
Low Battery Signs
A weak battery can cause the tester to give wrong or no readings. Watch for dim lights or weak sounds from the tester. If it fails to turn on or reacts slowly, change the battery immediately. Regular battery checks keep your tester ready for accurate measurements.
Proper Storage
Store your voltage tester in a dry, cool place away from dust. Avoid leaving it in direct sunlight or extreme temperatures. Use a protective case if possible to prevent damage. Proper storage extends the life of your tester and keeps it working well.
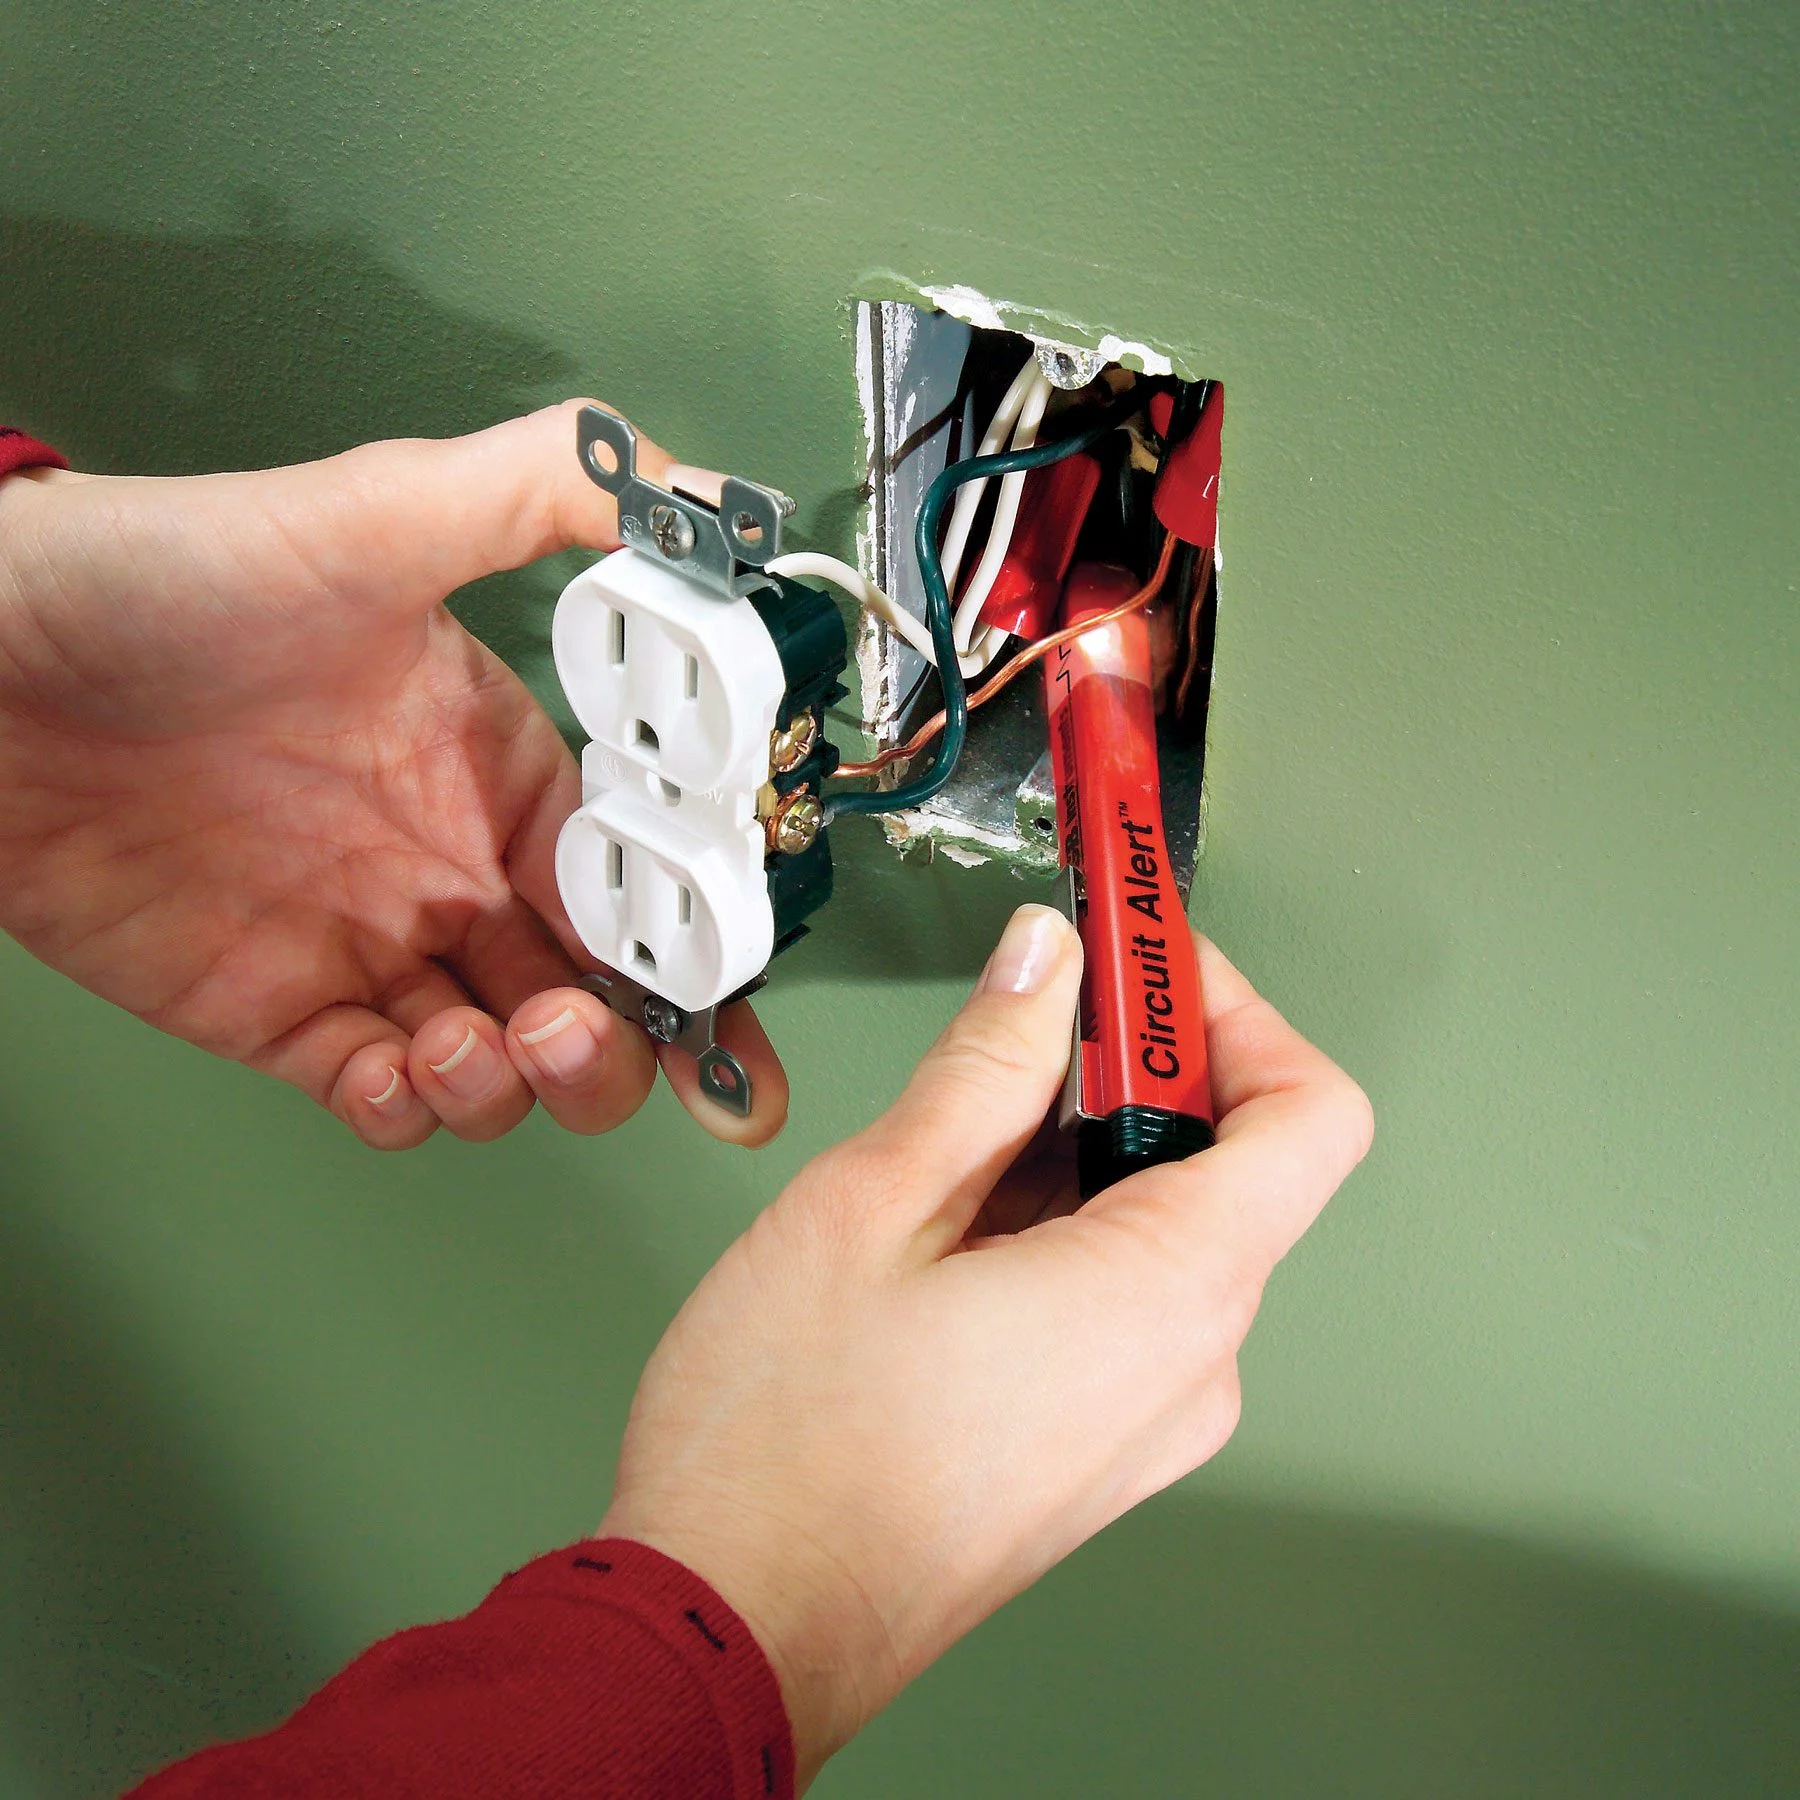
Credit: www.familyhandyman.com
Maintaining Your Voltage Tester
Maintaining your voltage tester ensures it works accurately and lasts longer. Proper care helps you avoid false readings and unsafe situations. Simple upkeep tasks keep your tester ready for every job.
Cleaning And Care
Keep your voltage tester clean and dry. Wipe the exterior with a soft cloth. Avoid using water or harsh chemicals. Store the tester in a protective case. Prevent dust and dirt buildup on the probe tips.
Regular Testing And Calibration
Test your voltage tester regularly to check accuracy. Use a known live source to verify it works correctly. Calibration may be needed if readings are off. Follow the manufacturer’s instructions for calibration. Accurate results depend on proper calibration.
Replacing Batteries
Replace batteries as soon as power weakens. Weak batteries cause incorrect or no readings. Use the recommended battery type only. Open the battery compartment carefully to avoid damage. Dispose of old batteries safely to protect the environment.
Credit: www.instructables.com
Related testing guides: A voltage tester is best for quick live-voltage checks, while a multimeter gives more detail. For deeper troubleshooting, see how to test a battery with a multimeter, test a fuse with a multimeter, and check ground with a multimeter.
Frequently Asked Questions
How To Properly Use A Voltage Tester?
Hold the voltage tester by its insulated handle. Touch the tester tip to the wire or device. Look for a light or sound indicating voltage presence. Always test on a known live source first to ensure the tester works. Follow safety precautions to avoid electrical shock.
How Do You Use A Voltmeter For Beginners?
Hold the voltmeter’s probes by insulated handles. Touch probes to two points in the circuit. Read the voltage on the display. Ensure the meter is set to the correct voltage range before testing. Always follow safety precautions to avoid electric shock.
How To Test Live Wire With A Voltage Tester?
Hold the voltage tester by its insulated handle. Touch the tester tip to the wire. A beep or light indicates a live wire. Avoid touching metal parts during testing.
How Do You Check 240v Voltage With A Multimeter?
Set the multimeter to AC voltage mode. Insert probes into the outlet slots or touch wires. Read the display; it shows the voltage, typically around 240V.
What Is A Voltage Tester Used For?
A voltage tester checks if electricity flows in wires or devices safely and quickly.
Conclusion
Using a voltage tester helps keep electrical work safe and easy. Always hold the tester by its handle. Test wires or outlets carefully for live electricity. Watch for lights or sounds that show voltage presence. Double-check before touching any electrical parts.
Regular practice improves your confidence and skill. Stay cautious and follow safety steps every time. A voltage tester is a simple, useful tool for home projects. Remember, safety first to avoid accidents or shocks.
Related reading: Best Multimeters for Automotive.
Related reading: Best Value Multimeters.
Related reading: Best Voltage Testers.
Related reading: Best Digital Multimeters.
